sábado, 18 de mayo de 2013

My Basic 김치 (Kimchi)

Yay to making my own 김치 (Kimchi)! This is a basic (and vegan!) recipe, and fairly easy to make. I know there's "11 steps," but most of these steps are really easy. I just made a step for each picture I took to keep it easy to understand. I like making my own kimchi because I can add the amount of spice I want, it contains no fish paste, and it doesn't taste like the ..uh hum... so called "kimchi" I find at the grocery store here. See the end for some variation ideas.

I make each batch about a week before I intend to use it. The flavor of kimchi can change with time, so it's all a matter of experimenting to find out how many days/weeks (perhaps months?) you want it to ferment in your fridge to find the flavor you like. I obviously like the way a week + tastes. Read this whole recipe before you intend to make any, and always use CLEAN utensils when making and picking out the kimchi from the bottle (no licking then picking etc.) as the kimchi can mold and your um... saliva will, I assume, change the flavor for the worse... I also use my sink as my kimchi making "work station," and I make sure to clean that before use too. Hope you enjoy:

Basic Kitchen utensils and stuff, all CLEAN:

Large bowl
Small bowl (I use small rice bowl)
Cutting board & knife
Large vegetable strainer
CLEAN, inside AND out, glass (or plastic) jar, approx. 300 ml size (I think that's the size)
Small rice paddle, or spoon of the same size. I use a rice paddle because it's easier to press the kimchi down (Step 8)
Small plate with edges (see step 7)
A few paper towels

Ingredients:

Half a medium sized bok choy cabbage, 白菜/はくさい in Japanese
Salt, a liberal amount, see step 3

Ingredients after soaking:

Hand minced fresh garlic, about 3 to 4 medium cloves worth
Hand minced fresh ginger, about 1/2 the amount you use for the garlic
1 small to medium onion (any kind), sliced up into thin strips
Soy sauce, maybe about 5 or so tablespoons. See step 4 for a visual (remember I myself don't measure)
Vinegar, 1/2 tablespoon (optional, but I like the tang it adds)
고춧가루, red pepper powder, 1,2,3,4 etc. heaping teaspoons worth, depending on your spice preference(I used 4 here). This is straight up 唐辛子/とうがらし powder with NO added extras. They sell the type specifically used for kimchi in Korea, but you might be hard pressed to find this in Japan. I can't stress enough that this be the pure red pepper powder, or else you might end up with sugar or other fun things added in (like fish powder, read your labels)that many Japanese seasonings contain. You just can't get around substituting for this ingredient, sorry...

Step 1.


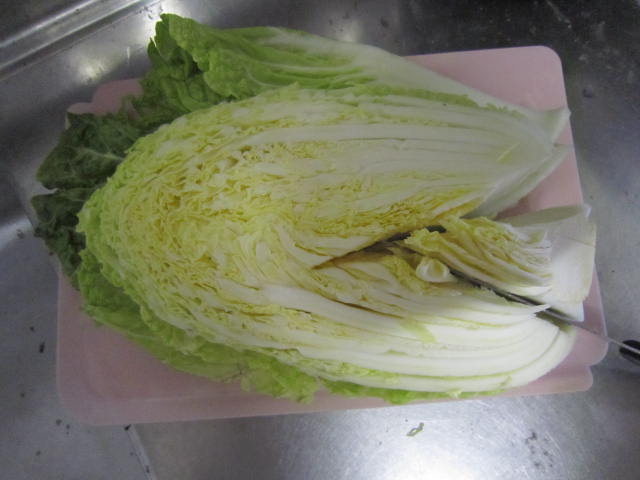
Remove any visibly "not so great" parts of the cabbage, like little black spots (or sometimes bugs ha ha). Cut the core out of the cabbage as pictured above.

Step 2.


Now cut it in half as pictured above. Then cut up these two halves into mediumish pieces. Pick out any more visibly "not so great" pieces, like overly black spotted pieces. Some pieces of the cabbage will have tiny tiny black spots. A few are alright, but if too many, take them out. When all that is removed, wash the cabbage thoroughly. Place the washed and cleaned pieces in the strainer.

Step 3.


Place the cleaned and washed cabbage pieces into the large bowl. Fill with water, swish around with your (clean) hands, drain. Do this 2 or 3 times and drain the water. Then sprinkle with a fair amount of salt (I'm guessing like 4 or 5 tablespoons worth), fill bowl again halfway with water and mix around with your hand to swish all the cabbage in the salt water

Then fill up the bowl with more water to cover most of the cabbage. It's okay if a few chunks stick out. Cover with a large clean plate (or seran wrap) and let soak overnight, or less, see note below. When done soaking, drain water from bowl, fill with clean water, swish around then drain again. Do this one or 2 more times to remove excess salt.

One handful at a time, place the cabbage in the strainer and press down to let excess water drain out from the cabbage. Do this until all the cabbage is in the strainer. Rinse the large bowl, and wipe the inside dry with a clean paper towel.

Important Note: If making in the hot humid months, only let the cabbage soak for a few hours or less, maybe even only half an hour. Kimchi is traditionally a wintertime food, so if it's cold enough, you can leave the cabbage to soak overnight, otherwise, only let soak for a few hours or less. I.e. You don't want it sitting in warm water overnight.

Step 4.


Place the garlic, ginger, and onion in a small bowl. Pour enough soy sauce over to look like the picture above. I'm guessing it's 5 tablespoons or so. I placed a 1 cup measuring cup in the picture for perspective.

Step 5.


Place about half the cabbage from the strainer into the now dry bowl. Now the fun part!

Step 6.


Pour the contents of the onion bowl into the large bowl. Add the vinegar (optional), and sprinkle the chili powder over everything. Start mixing slowly with the rice paddle by folding the bottom contents of the bowl onto the top contents. Do this carefully so as to avoid spilling anything out of the bowl. Add the rest of the cabbage and continue folding to mix until everything is evenly distributed.

At this point, be careful not to touch or spill much stuff. It will start getting messy, so avoid spilling or touching other non-clean surfaces like counter tops or even the inside of the sink and such. If you do spill, you'll have to wash what fell out, but then that means you may have to wash the other utensils to get them clean again, your hands to get them clean again as well, etc. So just do this slowly and carefully so as not to spill much into the sink area.

Step 7.


Place the CLEAN (both inside AND out) and dry jar onto a clean edged plate as pictured above. Using the small rice paddle, scoop bits of the kimchi mixture into the jar while holding the jar over the mixture (in case it spills, it'll spill back into the bowl and you'll avoid losing kimchi to the sink monster).

Step 8.


Keep scooping until you get a nice layer, and begin to press the kimchi down with the rice paddle. Press firmly.

Step 9.


Keep scooping and pressing, and you'll notice that the kimchi will begin to let out some juice. Press down harder as you add more kimchi. It's alright if some of the juice spills over onto the jar or the plate. It is CLEAN after all remember.

Step 10.


Most of the kimchi should fit into the jar (any extra you can eat soon as your done). Keep filling and pressing the kimchi mixture until it reaches the top of the jar. See how the juice poured out onto the plate after pressing down firmly? Since everything is clean, place the jar in the large bowl and pour the extra juice from the plate into the jar to fill to the brim.

Using a clean paper towel, wipe the outside top part of the jar (where the lid gets screwed on to) clean. Then screw the jar lid on tightly, but not too tightly or it will be impossible to open later.

Step 11.


Scoop out any extra kimchi mixture from the large bowl into a small plate (see first pic above). Be sure to eat these leftovers the same day, preferably within an hour or two. Refrigerate until then.

Rinse off the extra kimchi juice from the now sealed jar and wipe it dry. Take some pictures to show your friends. Place the jar in the fridge and let the magic potion ferment. I like to let it ferment for a week, but a minimum of 3 days should be fine. Then you'll be ready to eat, hoping that you didn't screw the jar top on too tight making it difficult to open :)

Eating/serving: when picking the kimchi out from the bottle, ALWAYS use CLEAN utensils (no licking and double dipping). I use chopsticks to pick out the amount I want to use. When done picking out, be sure to press the kimchi down again so that everything in the jar is always covered by its own juice and that you seal the jar tightly again. If you don't do this, the top not-in-kimchi-juice bits might mold (which you can just carefully remove and salvage the rest), or it will change the flavor in not-so-good ways (edible, just strange...). Keeping everything submerged in the juice at all times will preserve it longer. You may even notice how the flavor changes day by day. But you probably want to consume this medium sized batch within a week or so of opening it. So always remember clean utensils, and cover everything in the juice at all times. Enjoy!

Variations: This is a basic recipe I came up with after looking at a few online recipes and making a few batches. You can use the same steps to make other types of vegetable kimchi as well, and even add things like radishes or scallions/chives. I also make a sliced cucumber and a sliced onion kimchi using smaller portions and smaller jars. I simply omit the overnight salt water soak and start at step 4.

With the cucumber kimchi, it's a bit harder to get the juices out from pressing firmly. So you may want to add a tad bit more soy sauce or even a very small amount of water to the mixture in the bowl.

With the onion kimchi, I simply use more sliced onion. If the onion is of good quality, the onion will become sweet after fermenting for a while. The spiciness from the red pepper powder mixed with the natural sweetness of the onion is fantastic!

Experiment with other vegetables and fermenting times, then begin practicing the wonderful art of kimchi making. Happy eating!

martes, 14 de mayo de 2013

Curried Mashed Potatoes

This recipe is not vegan, but you can adjust and easily make it so. The name pretty much sums up this recipe. You can use an array of spices, not just the ones I used here. Also, I included a bit of carrot leaves. My farmer's market JA down the street had carrots with the leaves still intact, so I chopped that up and added it in at the last minute. Obviously, you don't have to add this, but can you tell I really like using all sorts of vegetable related everything? I rarely ever know what I'll be making until after I visit the market anyway :)


Makes about 5 servings
Ingredients:

Potatoes, enough to fill a smallish pot halfway or 3/4 full, washed, peel intact or not depending on preference
Diced onion, about 1/2 of a big onion's worth
Diced garlic and ginger, I use a bit more garlic
Oil for frying
Curry powder, any kind you like, tends to be a mix of coriander, turmeric, and cumin, 3 heaping teaspoons
Spice mix, I use one that has cloves, anise, and some other stuff?, a few sprinkles
Cinnamon, a few sprinkles
Pepper, to taste
Salt, to taste
Butter, unsalted, maybe 1/4 or 1/2 stick, cut up (or margarine for vegan)
Dried herbs, oregano, parsely etc., to taste
Milk, about 1/2 cup (soy milk for vegan)
Chopped up carrot leaves, or parsley (optional)

Cut up the potatoes and place into a pot. Cover with water, bring to boil. Boil until soft, drain. Mash them up using a fork or potato masher.

While the potatoes boil, fry the onion, ginger, and garlic in another pot over medium heat. When the onions have become semi-translucent, add the spices (minus the salt) and continue frying, lower the heat a bit, and mix so nothing burns onto the pan (a little sticking is alright).

Add the mashed potatoes into the pot with all the spices, lower the heat. Add the butter and use a spoon to coat all the potatoes with the saucy deliciousness on the bottom of the pan while the butter starts to melt. When all is mixed well, add any dried herbs you'd like, and sprinkle some salt.

Add the milk. You can turn the heat up a bit if needed, but not too high. Continue mixing until the potatoes start to do the bubbly pipey thing, that means they're hot and ready. Make sure not to burn anything.

Finally, add the chopped up carrot leaves and continue mixing and cook for a short while, maybe 2 minutes. Ready to serve!

Variations: You can sprinkle some cheese over the potatoes when you serve them, or you can even add Parmesan cheese into the potatoes as they cook. Just add it in at the same time you add the milk.

lunes, 13 de mayo de 2013

Purple Potatoes, Purple Rice, Stir Fry, Tofu Scramble

This is a post with a few recipes, i.e. my dinner. This is pretty much how I eat most every night I cook during the work week. I use leftovers for lunch the next day. This meal should feed maybe 3 people, 2 if you eat like me. The stir fry may look like a "regular" stir fry, but thanks to one of my favorite restaurants' ideas back home, I now do a few things to the stir fry to make it better in my opinion, ha ha. For this meal, I first put the tofu to press (to give it time to let out some water, see recipe), then I washed, cut, and boiled the potatoes before any other prep work. Then I cut up all the vegetables for the other 2 dishes, and then poured the purple potato water in with the drained rice and pushed the magic rice cooker button. As the rice cooks, you can make the stir fry and the tofu scramble at the same time. Enjoy!


Dinner!


Purple Sweet Potatoes

Pretty basic. You can use any sort of cool colored starchy vegetable for this really. Cut up some purple sweet potatoes, put in a pot with water (no salt). Bring water to a boil, lower heat, then boil them until soft. Reserve the water for the following purple rice:


Purple Rice
Ingredients:

1 to 2 cups presoaked rice. I.e. washed, rinsed, and left to soak for a few hours.
Grains to add to the rice
Purple water from boiling the purple potatoes

Basically, pour out the soaking water from the rice, put rice in rice cooker, and also pour in the grains. You can usually find the 'add-in' special grains to add to rice in the same area of the store you find the rice in. My drug store even sells the grains, so they're pretty easy to find. That's what those little things that don't look like rice in the picture are.

Pour enough purple potato water to cover the rice, and push the magic button on your rice cooker. Start cooking the rest of the stuff now.


Vegetable Stir Fry
Feel free to use any sorts of veggies really, but for this recipe, be sure to have some sort of leafy greens (spinach used here).

Ingredients:

Oil for frying
Sliced onion
diced up ginger and garlic, as much as you like
Dried red chili peppers, seeds removed as much as possible, and cut into tiny little pieces
みりん, sweet fermented rice wine, about 2 to 2 1/2 tablespoons, OR about 2 teaspoons brown sugar
Soy sauce, about 2 to 2 1/2 tablespoons or more
Pepper to taste

A few bushels of spinach(is that what you call them?) or other leafy greens, washed and cut up
A few stalks of asparagus, washed and chopped up
Fresh broccoli and cauliflower, you guessed it, washed and cut up
Some mushrooms, any kind really, washed etc.
Bean sprouts, もやし in Japanese. 1 medium package (prewahed)

In a large pot, fry the onions, red chiles, ginger, and garlic over medium heat. When onions become a bit translucent, add the asparagus and continue to fry for a short bit. Add in the broccoli and continue to fry and mix so nothing sticks to pan.

Add the mirin (or sugar) and mix around. Sprinkle some pepper (optional). Lower the heat a bit and add the Spinach on top of everything. Pour the soy sauce over the spinach and cover the pot. Let cook covered on low heat until the spinach wilts a bit, about 5 minutes. Place bean sprouts on top of spinach, cover and continue cooking for another 3 minutes or so. If necessary, add a bit more soy sauce to keep everything from sticking to bottom of pan.

Mix everything around, and you're ready to serve!


Tofu scramble
Ingredients:

Oil for frying
A block of tofu (water pressed out, see below), a softer tofu works best
Spices. About 2 tablespoons perhaps. I used curry powder (mix of turmeric, cumin, coriander)
Nuts. I used peanuts, but I suppose any kind will do

Press out the water from the tofu. I learned this method from another blog:

Place the block of tofu on a flat plate. Then place a clean container cover (or something flat) on top of the block of tofu. Then put something heavyish, but not too heavy, on top of this flat surface (too heavy will make the tofu tear). I used a can of beans as a weight as was mentioned in another blog. Let sit like this for about 15 minutes or longer, draining the water out of the plate every so often. Hint: do this first before you start cooking or prepping so water is drained out by time you need to cook.

Once tofu is soaked out of water (mostly anyway), dice it up a bit. No worries about perfection, you're going to scramble it anyway.

In small pot, heat up some oil on medium heat. Once oil is hot, lower heat, and drop in tofu. Mix immediately and quickly to avoid burning. Let it all heat up and get all bubbly. Dump out any extra moisture that may be coming out too. Add the spices. Any spices you prefer are good, but I like the way a bit of curry powder and pepper taste. Mix and continue to cook.

There may be a bit of moisture coming out, but that's okay, you can just continue dumping it out. Keep cooking until all the moisture is gone or at least most of it. Use a large spoon to serve, and be sure to serve with as little moisture as possible. Add the peanuts to the served tofu, mix, and it's ready.

It may never be the texture of scrambled egg, but it comes close. You can also add broccoli to this recipe, it's delicious.

Happy Eating!!

domingo, 12 de mayo de 2013

Semantics of "Meat" in Japanese

Welcome to Japan! Where you will find some of the freshest most local vegetables you have ever known. But where you will also find meat, especially fish, in just about every product that exists in this country. And, if you don't speak lots of Japanese, the challenge of eating out and being vegetarian is even more daunting (it still is for me, and I know Japanese ha ha). So let's look at some linguistic things around the concepts of meat in Japanese, and hopefully you'll better be able to order well without getting the surprise meat/fish in your dish you thought you were very clear about not ordering.

The word for meat in Japanese is 肉(にく/niku). That includes 牛肉(ぎゅにく/gyuniku, cow meat, i.e. beef), 鶏肉(とりにく/toriniku, bird meat,i.e. chicken) and 豚肉(ぶたにく/butaniku, pig meat, i.e. pork). So when you say "肉を食べません(にくをたべません)" what you are saying in Japanese is you don't eat beef. (Some folks will extend the concept to chicken and pork, but not always).

Now if you say you don't eat fish, 魚(さかな/sakana), you sort of imply that you don't eat fish, but you still eat other seafood.

This constant round of questions and long lists of what you don't eat can be one of the most tedious things to deal with while being vegetarian in Japan, but in a sense, get used to it. Especially if you are living on a fishing heavy island like me ha ha ha.

So remember, when you say "meat" in Japan, it means mainly the above 3 types of meat. Where in many of our home languages we say "meat" and most folks will include fish and chicken in their definitions of meat, that is not always the case in Japanese, especially if you're one of the few vegetarians some folks have ever met.

So, I've found that saying anything that is/was an 生き物(いきもの/ikimono, living thing) is something I won't eat. But don't fret, most people are just genuinely curious, not being malicious about why you don't eat animal. So learn the long list of animals and animal products you won't eat, and be prepared to be asked "is ____ okay" a million times.

Some popular meat/fish related words in Japanese:
いか/ika, squid; うなぎ/unagi, eel; うに/uni, sea urchin; たこ/tako, octopus; 卵/tamago, egg; えび/ebi, shrimp. Also, know that there is an endless name for local fish and sea creatures, so be prepared to extend your marine life vocabulary :)

The kanji for fish 魚(さかな) is a radical. So, if you see this kanji as a radical on packaging in the ingredients(材料/ざいりょう) list, it is almost guaranteed to have fish, with one exception I can think of: The word "新鮮/しんせん" means "fresh" in Japanese. So although the 鮮 has the radical for fish (魚), 新鮮 just means fresh, and it is usually on packaging for vegetables.

One important character to know would be: 鰹/かつお. This is the bonito fish, and is found in just about everything. And I do mean everything, from sauces to broths to dressings to crackers to chips/crisps. It is hard to escape the bonito fish in Japan, and you may indeed unknowingly consume this (mainly because most people are unaware of how it is actually in everything). But if it's a packaged food, the kanji or hiragana will be on it, so just make sure to read your labels well.

sábado, 11 de mayo de 2013

ゴボウ金平 (Gobo Kinpira)

ゴボウ金平 (Gobo Kinpira) is usually served as a side dish to accompany other dishes as part of a meal, and I usually see it in bentos as well. Gobo is apparently the root of the greater burdock (whatever that is). It is VERY easy to find in Japan, is consumed widely, and is relatively cheap. My version of gobo kinpira is basically strips of gobo cooked with strips of carrots. Sometimes the Gobo is very dirty as it is a root. However, if I can wash all the dirt off and get the peel relatively clean, I don't peel my Gobo to try and retain more vitamins. But if it looks too dirty or you're not a fan of rooty things, feel free to peel the gobo root before you cut it up.


Makes 4 nice side dish servings
Ingredients:

2 ゴボウ, gobo root, stalks. They are usually sold like this. Washed and cut into thin bite size pieces.
About 6 small, or 4 large carrots. Cut into thin bite size pieces
Oil, a tad bit for frying
みりん, sweet fermented rice wine, about 1 to 1 1/2 tablespoons
焼酎, shochu alcohol, (optional) about 1 to 1 1/2 tablespoons
Soy sauce, about 1 to 1 1/2 tablespoon, I think
Sesame seeds, a tablespoon should suffice

In a large pot or frying pan, heat the oil over medium heat. Add the strips of Gobo and mix quickly so it doesn't burn or stick to the pan. Fry and mix for about 2 minutes and immediately lower the heat

Add the mirin (rice wine), the shochu (optional), and mix this around to cover the Gobo well. Cook like this for a few minutes, until the Gobo seems well covered and the mirin and alcohol have evaporated some. You can pick the heat up for just a bit if needed to speed things up, but return to low heat.

Add the carrot strips and pour the soy sauce over everything. Mix well to cover everything. Continue cooking at low heat, making sure nothing sticks to the pan. It is done when the Gobo strips are no longer hard, but not too soft either.

Turn off the heat, add the sesame seeds, mix well again. Serve. Simple and easy.

Veggie Intense 김치국밥 (Kimchi Gukbap)

김치국밥 (Kimchi Gukbap, a type of kimchi soup I guess) is another one of my favorite Korean dishes and almost a staple in my cooking here in Japan. Yes, I do make lots of Korean/Japanese fusion type things, since I like both the spice in Korean food and the crazy freshness of veggies I get at my local JA down the road. I make my own kimchi (recipe soon) to avoid the use of fish paste and to add more spice than the Japanese kimchi you mostly find here. I also use whatever vegetables are in season so it comes out pretty cheap as well. This dish always leaves my tiny apartment very fragrant and my stomach very happy.


Makes about 4 nice servings
Ingredients:

A bit of oil for frying
Sliced onion, about 1/2 onion works
Fresh dried red chiles (とうがらし/唐辛子). About 4,5,6 depending on how hot you prefer. Diced up with much of the seeds removed
Diced ginger and garlic, enough for taste
고추장, red pepper paste, called コチュジャン in Japanese, maybe less than a tablespoon
고춧가루, red pepper powder, straight up とうがらし powder with no added extras, about 2 to 3 teaspoons.
Some dashi konbu, either in little powder packets, or a big piece of kelp
Some fueru wakame, dried seaweed, cut up into bits (I usually use scissors)
Tofu, one package. Soft or firm depending on likes
Bean sprouts, もやし in Japanese. 1/2 a package
Kimchi, a nice big portion
Fresh steamed rice, enough to put in bowls and pour soup over

Seasonal vegetables, cut up, such as:
Shiitake mushrooms しいたけ
Eringi mushrooms えりんぎ
Enoki mushrooms えのき
Green peppers ピマン
Spinach ほうれんそう
Carrots にんじん
Even potatoes and pumpkins, じゃがいも and かぼちゃ

In a large pot, なべ, fry the onions, the dried chili, the garlic, and the ginger over low heat. This may be incredibly fragrant, so be sure to ventilate your kitchen if you can. Else you may be coughing and tearing up a bit.

Add the chili powder and fry quickly.

Add about a cup of water to the pot. Put in a bit of the powder from the dashi konbu packet, or/and the big piece of kelp, mix well. Add in all the vegetables, the fueru wakame, and the tofu. Pour in more water to cover everything slightly. Bring everything to a boil, and then boil on low heat. Keep on low heat so all the flavors will mesh well, and until any harder veggies like potatoes cook thoroughly.

After about 10 to 15 minutes or until everything is cooked well, add the bean sprouts and the kimchi. Mix well, and let boil for a bit until the bean sprouts cook, about 3 minutes.

In a large bowl, place a bit of freshly cooked rice. Pour a nice serving of the soup over the rice and you're ready to eat. Delicious!

Note: I make my own kimchi because I don't find the kimchi sold in most Japanese stores to be very spicy, plus they tend to all have fish sauce. But you can use the store-bought stuff for this recipe if you'd like; the dried peppers and chili powder should offset the non-spiciness of the store bought kimchi in this recipe. As always, feel free to play around with amounts and ingredients.

Basic 떡볶이 (Ddeokbokki)

떡볶이 is a popular Korean dish found in many little street-side stands and markets throughout Korea. It may be a bit hard to find some of the ingredients in Japan, but larger supermarkets may carry them. But even my small grocery store carries the red pepper paste, so be sure to look and ask. You'd be surprised at how much you can find. Without further ado:


Makes 1 to 2 servings
Ingredients:

떡, (ddeok/tteok) rice cake thingies. ドック in Japanese I think, small package
고추장, red pepper paste, called コチュジャン in Japanese, 1 tablespoon
고춧가루, red pepper powder, about 2 to 3 teaspoons. **This is not the shichimi tougarashi, it is pure red pepper powder without the added extras. This may be the most challenging to find.
Dashi seaweed, i.e. a nice sized piece of kelp
みりん, sweet fermented rice wine I think it’s called in English, ½ tablespoon
1 to 1 ½ cup water/broth
Soysauce, about ½ tablespoons
Carrots, cut into thin bite size slices
Onion, cut into thin slices as well
Garlic & ginger, diced up and minced
Sesame seeds and fresh herbs for garnish

In a large frying pan or medium pot, fry the onion, ginger, and garlic on medium heat until the mixture smells nice.

Add about 1 to 1 ½ cup of water or broth. Add the kelp, the red pepper paste, the mirin, and the soysauce. Mix well, then add the chili powder and mix again. Bring to a boil, remove the kelp, then add the ddeok. Keep mixing so the ddeok does not stick to the pan.

Once you add the ddeok, bring everything to a boil over medium heat. Remember to stir constantly so nothing sticks to the pan and burns. Lower the heat, add the carrots. Keep mixing the mixture as it boils on low heat. Cook like this for about 5 to 8 minutes. It’s ready once the ddeok is no longer hard and the mixture is no longer watery.

Pour the ddeok with a bit of the sauce over it into a plate. Garnish with sesame seeds and herbs. Enjoy!

Variations: Add whatever you feel like really. Some folks add scallions, some add rice noodles in addition to the ddeok. Play with the portions too and find a flavor that you like. The recipe is pretty basic and easy, so there are many possibilities.