viernes, 22 de noviembre de 2013

Damn Good Chile!

One thing you'll likely not find much of in my cooking is speed. I'm not a huge fan of "quick and easy" recipes. Not that I'm against them or anything, I just prefer my food to cook on super low heat for hours to let flavors mesh better, and even to let it sit for a day sometimes. This is one of those recipes :) I'd been really wanting something hearty as the cold weather starts to come, and I seem to have done it with this chile. I would have preferred to put in fresh non-sweet white corn instead of the edamame, but the edamame came out quite nice. If you can't find/have the dried chiles (which you likely won't if you live in Japan), you can just use about a tablespoon of red chile powder, that should be fine. I added the onions and bell peppers last so that they could still be a bit crunchy when served, but you can add them in with the carrots if you like. Finally, all the amounts are guesstimates, so feel free to not use measuring anything ha ha. Hope this helps keep you warm this winter.


Cook Time: 2 to 3 hours, plus overnight soak for beans

Makes about 8 to 10 servings

Ingredients:

Dry beans, large type like lima, kidney, etc., whatever your store stocks. About 3 cups dry
Dried small chile pepper, deseeded
5 smoked chipotle peppers, deseeded
1 dried chile rojo, deseeded
2 chile de arbol, deseeded
Garlic, 5 to 7 cloves, chopped up into small pieces
Very ripe tomatoes, 2 medium, diced up into small chunks
Red wine, cheap kind is okay, about 1/4 to 1/3 cup
Olive oil, 4 tablespoons
Mirin (sweet fermented rice wine), 1 tablespoon
Soy sauce, 1 & 1/2 tablespoons
Shiitake mushrooms (or similar type), 15 small, stems removed and cut in half
3 medium carrots, diced into medium chunks
Edamame, removed from pods and rinsed, about 1 cup's worth
Onion, 1 medium, diced up
Bell peppers, 10 small, diced up

Spices, to be added in all at once:

Bay leaves, 4
Dried oregano, 1 teaspoon
Dried parsley, 1 teaspoon
Dried basil, 1 teaspoon
Black pepper, 1 teaspoon
White pepper, 1/2 teaspoon
Ground cumin, 1 teaspoon
Cinnamon, 1/2 teaspoon
Nutmeg, 1/2 teaspoon
Paprika, 1 and 1/2 teaspoons
Salt, 1 teaspoon

Soak the beans overnight or for at least 8 hours. I suppose you could use canned beans, but I don't like doing this as you can't control the flavor of what comes in a can, plus it's just not as fresh

The next day, rinse the beans and place in a large pot. Pour enough water to just barely cover the beans. Turn the heat on to medium high. Once the water begins to boil, lower the heat to the lowest setting possible.

Add the small pepper, the chipotle, the chile rojo, and the chile de arbol to the side of the pot. Cover the pot and let cook for about 3 minutes.

Remove the dried chiles with a fork or chopsticks and put in a blender. Use a ladle to scoop out some of the bean water and add to the blender. Blend this until there are no more big chile chunks in the mix. Add this back to the pot of beans, pouring more bean water into the blender and shaking it around to make sure you get all the mix from the blender out.

Add the tomatoes, red wine, olive oil, mirin, soy sauce, and all the spices. Stir well.

Add more water to the pot to cover everything. Don't add too much water though, a few cups should be alright. Let this come to a boil, lower the heat, then cook on a low flame for 1 hour to 1 and a half hours.

**Note: Check that the beans are cooking well, they should be soft after about 1 to 1 and a half hours, even if not completely cooked quite yet. Basically, if you take one out and it is too hard to chew, they are not ready. If this is the case, let this pot boil on low heat for another 20 minutes or so, then proceed with the next steps.

Add the shiitake, carrots, and edamame. Stir well.

Let the chile cook for another 30 to 40 minutes, then add the onions and bell peppers and stir well. Cook for another 15 to 20 minutes to let all the flavors soak in well.

Enjoy with whatever the hell you want; like crakers, bread, rice, whatever you fancy. Happy eats :)

martes, 19 de noviembre de 2013

Potato Tofu Saag (and Roti)

When Japan gives you spinach, make saag! This version is vegan too, and comes from looking at a couple recipes online and coming up with my own processes and ingredients. Amazing what a little creativity can do. However, if you do prefer the dairy in your saag, substitute the coconut milk with whole whipping cream or unflavored yogurt, and the tofu for paneer (the cheese). If you don't have spinach, feel free to use whatever sort of dark leafy green you have available. Also, if you want to make this less spicy, omit the ingredients I've labeled as optional. Feel free to play around with spices and quantities to find something you like. This recipe and eating this yummyness helped me get over a stupid cold I had for a bit. Nothing like warm fresh food to soothe the soul. I served this dish with roti. See the link at the end of this recipe for how to make the roti. Happy eats :)


Makes about 6 to 8 servings

Ingredients:

Olive oil, about 5 tablespoons
Garlic, 4 to 5 cloves, chopped up into small pieces
Ginger, chopped up into small pieces, about 1 tablespoon's worth
Onion, 1/2 of a medium onion, chopped up into small pieces
Cumin seeds, about 1 & 1/2 teaspoon
Anise seeds, about 1/2 teaspoon
Curry powder, 1 & 1/2 teaspoon
Garam masala, 2 to 3 teaspoons
Dried herbs: oregano, basil, cilantro, a few dashes of each
Black pepper, 1/2 teaspoon
Cinnamon powder, 1/2 teaspoon (optional)
Nutmeg, 1/2 teaspoon (optional)
Chile powder, 1 teaspoon (optional)
Small dried chile, seeds removed (optional)
Tomato, 1 medium, diced up
Whole leaf spinach, 2 big ass bunches. Pick off the leaves from the stems, and wash them well to remove any dirt.
Coconut milk, 1/4 cup
8 very small potatoes (or equivalent amount, like 4 medium, or 2 large), cut up into small chunks
Firm tofu, 1 block, cut up into thick cubes (to resemble the paneer in saag paneer)
Salt, 1/2 teaspoon

In an extra large pot, place the garlic, ginger, onion, cumin seeds, and the anise seeds. Pour olive oil liberally all over everything. Turn the heat to medium and let everything begin to fry. Stir frequently.

After allowing the onions to fry and get soft, add the curry powder, garam masala, dried herbs, black pepper, cinnamon powder, nutmeg, chile powder, and the small dried chile. Stir frequently with a wooden spoon while the spices and onions begin to fry. Be careful not to burn anything.

Once the pot smells nice and the spices give off a good scent, add the potatoes and continue to fry for about 2 minutes. Then add the tomatoes and cook for another 3 minutes or so, until the mixture becomes hot and begins to bubble. Turn off heat.

In another pot, place all the spinach leaves. Add about 1/4 cup of water. Turn up the heat to medium, and allow the water to get a bit hot.

Once the spinach leaves begin to wilt slightly, immediately turn off the heat. Don't throw away the water. Place the spinach leaves in a large collander, and submerge in ice water (this preserves the color apparently).

Pour the warm spinach water (which should be clean) into the pot with the potatoes, and turn the heat to medium. Cover the pot.

Meanwhile, put all the spinach leaves into a blender. Put about 1/4 cup water, and blend. Blend the spinach until there are no longer any chunks and the mixture is smooth. About 1 minute of blending should do. Set aside.

Boil the potatoes on medium heat in the large pot for a short while, about 5 minutes. Then stir in the spinach from the blender. Add the coconut milk, and stir well. Add the tofu, and stir well.

Add the salt, stir, lower the heat, and allow everything to simmer for about 15 minutes. Stir occasionally.

Serve with roti (or whatever you'd like) and enjoy!

I added some cumin seeds to the roti recipe I used below, for a nice toasty cumin flavor. I simply mixed in the seeds with the flour before adding anything else. Obviously, omit the butter at the end or use a substitute to make them vegan. Here's the video/recipe link I used to make the roti:

http://showmethecurry.com/breads/rotli-roti-indian-bread-recipe.html

P.S. This vegan version of saag should taste better the next day when all the spices have been given a chance to mesh together. And you don't have to worry about any of the dairy spoiling.

lunes, 11 de noviembre de 2013

Horchata

Horchata! Quite easy to make, but does take a while because the rice has to be left to soak for a few hours. Surprisingly, there doesn't seem to be a similar horchata-like drink in Japan (that I know of), where rice is kind of a big thing... For this recipe, I would soak one or two cups of rice at a time over a few days as I continued to pour each bit of rice water into a big jar I kept in the fridge. Takes more time, but then you don't have to plow yourself with eating so much rice all at once. Also, since I always soak my rice for a few hours anyway before I cook it, this was a great way to reuse all this wonderful rice water. My drink came out brownish because I used brown sugar, but you can use white sugar if you like for a more traditional milky color. Horchata tends to be a simple drink with rice water, sugar, and cinnamon, but I added other spices too. Feel free to omit the optional spices if you like, but I think they added a nice flavor. Hope you enjoy!


Makes approx. 2 liters, can take a few days to make.

Ingredients:

Big ass glass (or plastic) jar, to hold at least 2 or so liters. Keep in fridge.
White rice, 4 cups unwashed (you can do a cup a day)
Sugar, 3 tablespoons(you can add more later if it's not sweet enough, start with 2 if you're like me and don't fancy sugary things)
Cinnamon sticks, 2 whole
Cinnamon powder, 1 teaspoon
Clove, 1 whole (optional)
Nutmeg, 1/2 teaspoon (optional)
Star anise, 1 chunk (optional)

In a small pot, add the sugar, cinnamon sticks, and cinnamon powder. Also add the optional spices if desired. Pour about 1/4 cup water into the pot and turn up the heat to medium-high. Stir occasionally. Once mixture boils, lower the heat to medium or low and continue to simmer and stir until all the sugar has dissolved. Pour this mixture with all the spices into your big glass jar and let it sit on the counter to cool off. Once the mixture is cool[ish], place in fridge.

In the pot you usually cook your rice in (or your rice cooker pot), place a cup of uncooked white rice. Add water to cover the top of the rice, and swish around with your clean hands. DON'T throw this water away. Let the rice soak for AT LEAST 2 hours (but preferably overnight if possible).

**If you want to use all 4 cups of rice at once, by all means be my guest. Just remember to eat all your rice when you cook it later, you'll likely be sharing :)

Once the rice has soaked, pour the water and now soaked rice into a large bowl with a strainer as such:


Remove the strainer, and put the rice back into the rice cooker/pot for you to cook later (with fresh water). Now pour the milky white colored water from the bowl into the big jar with the sugary mixture. Mix well. Place back in the fridge and allow to chill.

**Using a strainer like above helps to get all that rice water out of the soaked rice, while simply pouring it out by hand lets the delicious murkiness [i.e. the good stuff] settle at the bottom and become harder to get out. So try to use any kind of strainer to get all that goodness out and into your horchata.

Continue to do this over a few days until you have 2 liters worth. Or, you could just taste the horchata each time you add more rice-water to see if you think it's ready and suits your tastes. If the contents have settled, shake the jar, or swish the horchata around with a spoon before serving. Serve well chilled, in a glass with a few ice cubes if desired.

Note: it took me a while to realize that the key to good horchata is to use murky rice soaking water (duh, I know right...), so don't expect to make 2 liters worth using only 1 cup of rice, then you'll just have sugar water.

jueves, 7 de noviembre de 2013

Shiitake (and stuff) Stuffed green chiles

Sometimes I throw a whole bunch of random shit together and it comes out amazing. This is one of those recipes. The green peppers I used are ones I found at the coop by my house, they're the medium long green ones that are used in lots of Korean cooking, and I assume they are grown in other parts of Japan too. These ingredients may sound a bit strange in combination, but trust me, they make a crazy delicious dish! This one takes some time because of roasting the chiles and dicing everything up, but it is well worth it in my opinion. Also, remember, remember, remember that these measurements are only guesstimates on my part. I have quite a keen eye, but you don't need to follow the measurements in my recipes exactly (unless I specify so, which is rare). So yeah, happy eating:


Makes about 7 well stuffed medium sized chiles

Ingredients:

7 (or so) medium long green chiles, rinsed
Onion, 1 small, diced into bits
Garlic, 4 cloves, sliced into thin shreds
Ginger, diced into bits, about 2 tablespoons worth
2 small chile peppers (the spicy kind), deseeded and diced up
Oil, for cooking (like olive oil)
Tomato, diced up into small bits, about 1/4 cup worth
Shiitake, diced into bits, about 1/2 cup worth
Leafy greens (spinach, kale, or any greens, etc.) diced up into bits, about 1/2 cup worth
Curry powder (i.e. ground turmeric, coriander, cumin), 1 to 1 1/2 teaspoons
Dried herbs, oregano, basil, parsley; sprinkle of each
Rice wine (or any white variety) Vinegar, 1 tablespoon
Soy sauce, 2 tablespoons
Mirin (みりん-fermented sweet rice wine), 1 tablespoon
Peanuts, 1/4 cup
Raisins, 1/4 cup
Shredded white cheese (optional), for topping

First, the long part. In a large non stick pan (or grill), toast the chiles. Don't use any oil, just place them on the pan and turn on the heat to medium. The skins will start to cook a bit. Let one side cook, then flip the chiles over. Let the skins char a bit on all sides. You can cover the pan to help the chiles sweat a bit as they cook. If they look like they are just gonna burn, turn down the heat, you want them to cook evenly, NOT burn. The chiles are ready when they are really soft and kind of just droop when you pick them up from the stem. Turn off the heat, remove the chiles and set aside.

In the same pan, place the onion, garlic, ginger, small diced chile peppers, and about 2 to 3 tablespoons cooking oil (I like olive oil). Turn on the heat to medium. Stir with a wooden spoon or a spatula as everything cooks. Once onions are slightly cooked, add the curry powder and the dried herbs. Continue to stir constantly so nothing burns. Cook until everything becomes fragrant, about 3 minutes or so.

Add the tomato and continue to stir occasionally. Once the tomato juices are bubbly, add the shiitake. Stir occasionally and let the shiitake soften. Then add the vinegar, soy sauce, and mirin. Stir the mixture well.

Add the leafy greens, stir, and cover. Turn the heat to very low.

While the pan is cooking all that goodness, prep your green chiles. First, if you'd like (although I did not), remove the outer skins from your chiles. The toasting you did and the letting them sit for a while should make the skins easy to peel off now.

If you're like me however, leave the skins on. It'll be a different texture, but still delicious. Now grab a chile by the stem and hold it over a cutting board. Using a small knife, start at the top of the chile near the stem and make one cut along the chile until you reach the end/bottom, i.e. cut them on one side lengthwise. The knife should slide effortlessly as the chile is soft now. A bit of juice will spill onto your cutting board. Don't throw this away!

Once you've made a cut lengthwise, carefully remove the seeds and the stem into a separate bowl or something (not on the cutting board). Everything should come off super easily as the chile is soft. Be sure not to tear the chile apart as you do this however. Place the now deseeded/destemmed chile on a plate, and continue to do this with all the chiles.

When all chiles are done, pour the chile "juice" (with no seeds) from your cutting board into the cooking pan and stir. Add the raisins and peanuts to the mixture, stir again. Let everything cook for about 1 minute and turn off the heat. Time to stuff those chiles.

Place a chile on a serving plate. Using an eating spoon, grab a scoop of the mixture and plop it into the chile. Spread evenly. Sprinkle some cheese (optional), and fold the chiles to get the mixture inside like the picture. Continue until you've stuffed all the chiles.

Now you're ready to chow down! You can serve them with rice, or place in a tortilla if you have any. I added a few slices of avocado as a topping, delish!

Note: The green chiles I used were not very spicy (unfortunately for me), so I was able to clean the seeds and pull the stems out using my hands. Use caution if you're chiles are spicy though, just a reminder.

domingo, 3 de noviembre de 2013

Curried Edamame Hummus

Hummus, so hard to come by in Japan in general, in our island in particular. Today however, we adapted a recipe found online and made our own version of delicious edamame hummus. This is our "recipe" :)


Makes about 2 cups worth of hummus

Ingredients:

Edamame, 2 bags of unshelled (or about 1 1/2 cups shelled)
Garlic, 2 cloves, cut up into chunks (will get blended anyway)
Onion, 1 small, cut up into chunks
Curry powder, 1 level teaspoon
Red chile powder, 3/4 teaspoon
Garam masala, about 1 to 2 teaspoons
Dried herbs, oregano, basil, parsley, etc.; a nice sprinkle of each
Salt, a few pinches
1 lemon
Tahini paste, i.e. ねりごま(練り胡麻) sesame paste in Japanese, about 2 to 3 tablespoons
olive oil, quite a bit

If you bought unshelled frozen edamame, place them all in a large pot with water and put on a medium flame for about 3 to 5 minutes. They don't need to be hot, just soft. Now squeeze out the beans from the inside into a collander (big strainy thing you use to rinse pasta and stuff). You'll need about 1 1/2 cups of edamame beans. Rinse them off, set aside.

In a fry pan, add a nice amount of olive oil, the garlic, and the onion. Turn up the heat to medium and cook for a bit. Once the onions and garlic cook a bit, add the curry powder, chile powder, garam masala, dried herbs, and salt. Let everything fry for a bit, but don't burn it, about 3 minutes. Turn off the heat and let it sit there.

Meanwhile, in a blender, pour about 3 tablespoons olive oil along with the juice of 1/2 of the fresh lemon (use a small strainer to avoid seeds getting in). Blend for about 20 seconds until the oil and lemon juice whip together into a nice froth.

Now add the contents of the fry pan to the blender and blend again until smooth. Now for the tricky part, making the hummus in batches.

Add about half of the edamame, the sesame paste, and about 1 or 2 tablesppons olive oil. Blend. It will be chunky.

To get it less chunky, blend for a bit, turn off, then remove the top, press everything down with a spoon, then blend again. Keep doing this. Be sure not to put too much edamame into the blender or else it'll be very difficult to blend everything.

Once this batch is smooth(ish), remove what you can with a spoon and place in a large bowl. Don't worry about getting everything out quite yet.

Now add the rest of the edamame, the rest of the lemon juice, and some more olive oil (a couple tablespoons worth). Blend like above, pressing down, reblending, etc. Once the mixture is smooth, scoop the blender contents into the bowl and mix the two (or three or four) batches until well incorporated.

To get all the hummus out of the blender, unscrew the bottom of the blender, hold the now open bottom part over the bowl. Push out all the hummus stuck to the sides of the blender down with a spoon so it all falls into the big bowl. Mix everything well. Enjoy the hell out of this tasty ass hummus! Serve with chips or whatever else suits your fancy. We spread the dip on crackers, sprinkled some black pepper, and added a dash of tabasco. Yum!

Note: The blender I used is pretty nice, hence it didn't break when trying to make hummus. I wouldn't even try making hummus in a smaller blender (like the ones they sell for making smoothies). I'm pretty sure it'll break, as I broke my friend's trying to make mole, so I can't imagine it processing hummus. If you have a food processor however, you can skip making the hummus in batches and just throw everything in all together, lucky you.

viernes, 1 de noviembre de 2013

Capirotada

Lucky you, all the ingredients for Capirotada can be found in Japan (at least on my remote island). This is a Christmas time/ New Year's kind of food, but it can be eaten anytime really. It makes a wonderful "make the night before" dessert that's pretty easy if for whatever reason you find yourself lacking ideas for a dish to a potluck or something. Instead of the french bread that's usually required, and since the store seemed to have run out of french bread, I used a big loaf of パインパン, so ingredients are also easy to substitute. For example, you can use shredded coconut instead of the cheese and make it vegan friendly.


Makes about 6 to 8 servings. Must set overnight or at least 4 hours.

Ingredients:

Oil for frying
French bread/baguette, one large loaf, sliced thinly and then cut up into medium pieces
Peanuts (or your favorite nut), 1/4 to 1/2 cup, chopped lightly
Raisins, 1/4 to 1/2 cup
Shredded white cheese (the less salty the better), 1/2 cup or so

For syrup:

Cinnamon sticks, 2
Star anise, 3 whole stars
Brown sugar, 1/2 cup (or a little less than 1/2 a cone of piloncillo if you can find it...)
Water, about 2/3 cup

In a small pot, make a syrup. Cut up the piloncillo into about 4 chunks. If no piloncillo, just pour the brown sugar into the pot. Add the cinnamon sticks and star anise. Pour about 2/3 cup water in the pot and turn up the heat to medium. Stir occasionally, and add more water if necessary. Bring to a boil.

Once the liquid is boiling, turn the heat to low. Stir on low for about 5 minutes so the syrup can get all the cinnamon and anise flavor. Make sure all the sugar is dissolved, then turn off the heat. Put aside.

In a large fry pan, add some oil and heat on medium. Once oil is hot(not burnt), add the slices of bread and fry. Fry each side for about 1 minute in hot oil until the bread pieces are rather crispy, but not burnt, adding more oil as necessary. You'll want the bread to be crispy so that it won't turn to mush when left to soak in the syrup later. Place on a plate lined with paper towels when done frying to soak up some of the excess oil.

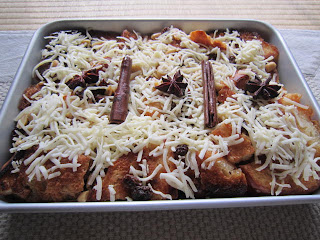
Line the bottom of a medium baking dish with the now crispy slices of bread. Top with the peanuts and the raisins. Use a ladle to spoon the syrup evenly over the now topped slices of bread. Then top with cheese. If you have a ton of ingredients left over, just keep adding more layers of bread, peanuts, raisins, syrup, and cheese.

Cover the baking pan with seran wrap or a plate or something, and place in fridge for at least 4 hours.

Cut out a piece of the capirotada like you would a cake or brownies, serve on a dish, and enjoy :)